Protect Your #1 Asset: Why a Timely Shingle Roof Replacement is Non-Negotiable
A shingle roof replacement is one of the most critical home improvements you can make, directly protecting your family and preserving your property’s value. Your roof is more than just a cover; it’s your home’s first and most important line of defense against the relentless Texas weather, from scorching summer sun to torrential downpours and high winds. Waiting too long for a replacement can turn a standard, planned project into a costly emergency. A single leak can lead to saturated insulation, stained ceilings, damaged drywall, and even dangerous mold growth, compromising your home’s structural integrity and your family’s health. Understanding the signs of wear and the professional replacement process helps you make smart, proactive decisions before minor issues become major, budget-breaking headaches. For homeowners in Texas, understanding this process is the first step toward securing a durable and reliable roof from the trusted roofing experts at Sienna Roofing.
Quick Guide to Shingle Roof Replacement:
- When to replace: Don’t wait for a leak. Proactively replace your roof if it’s over 20-25 years old or shows widespread signs of damage like curling, cracking, or significant granule loss. A professional inspection can determine its remaining lifespan.
- Average cost: While costs vary, most homeowners can expect to invest between $7,000 and $12,000 for a quality replacement on a typical single-family home. This investment protects your entire property.
- Timeline: A professional crew can typically complete a full replacement on a standard residential home in just 1-3 days, minimizing disruption to your daily life.
- Key steps: The process is systematic, involving a complete tear-off of old materials, a thorough inspection of the underlying roof deck, installation of new underlayment and flashing, and precise shingle installation.
- Best choice: Always opt for professional installation. This ensures the job is done safely, correctly, and is backed by both material and workmanship warranties, giving you peace of mind for decades.
Whether you’re dealing with the aftermath of a storm or planning for the future, having the right information makes all the difference in protecting your home.
I’m Andre Castro, CEO of Sienna Roofing, with over five years of dedicated experience in the roofing industry and a Construction Management degree from Texas A&M University. My passion isn’t just for building roofs; it’s for building trust. I’ve personally overseen countless shingle roof replacement projects throughout the Houston Metro area, and our company’s philosophy is simple: treat every home as if it were our own, ensuring each installation meets the highest standards for durability, craftsmanship, and customer satisfaction.

Sienna Roofing
Address: 17034 University Blvd, Sugar Land, TX 77479
Phone: (832) 564-3322
Is It Time? 7 Telltale Signs Your Shingle Roof Needs Replacement
Your roof works overtime protecting your home, and after years of battling Texas heat, storms, and hail, even the best shingles will start showing their age. The trick is catching the warning signs before a small problem escalates into a major headache and a significant, unplanned expense. Ignoring these signals is like ignoring the check engine light in your car—the problem will only get worse and more expensive to fix.
Think of these signs as your roof’s way of sending you a message. Some whisper quietly, while others practically shout for attention. Here’s a detailed look at what to watch for from the ground and in your attic:

1. Roof Age: This is your first and most reliable clue. Most standard asphalt shingles have a manufacturer-rated lifespan of 15-25 years. In a harsh climate like Texas, the constant UV radiation and thermal cycling can accelerate this aging process. If your roof is approaching the 20-year mark, or if you don’t know its age, it’s time for a professional inspection, even if it looks fine from the street. An expert can spot subtle signs of aging that are invisible to the untrained eye.
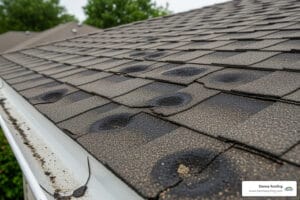
2. Curling or Clawing Shingles: This is a definitive sign of a roof reaching the end of its life. As shingles age, the asphalt in them dries out and shrinks, causing the edges to curl upwards (curling) or the center to lift while the edges stay flat (clawing). This isn’t just a cosmetic issue; curled shingles are highly susceptible to being caught and lifted by wind, leading to breakage and water intrusion. They are no longer effectively shedding water, putting your home at risk.
3. Cracked Shingles: Caused by wind damage, thermal shock from drastic temperature swings, or simply age-related brittleness, cracked shingles are direct pathways for water to penetrate your roof system. While a few isolated cracks might be repairable, widespread cracking across multiple areas of your roof is a clear indicator that the entire system is failing and a full shingle roof replacement is necessary to prevent underlying deck rot.
4. Bald Spots and Granule Loss: Those sand-like granules on your shingles do more than just provide color. They are a critical protective layer, shielding the asphalt from damaging UV rays, which cause it to break down. When you see dark, ‘bald’ patches on your roof or find an excessive amount of these granules in your gutters and downspouts, it means your roof’s primary defense is washing away. The shingles are becoming brittle and vulnerable to rapid deterioration.
5. Missing Shingles After a Storm: This is one of the most obvious signs of trouble. High winds can easily tear off shingles that are old, brittle, or have broken seals. Even one missing shingle exposes the underlayment and roof deck to direct rainfall, creating an immediate leak risk. This can also create a ‘zipper effect,’ where the wind can more easily get under adjacent shingles, leading to a cascade of further damage in the next storm.
6. Ceiling Leaks or Water Stains: If you see brown, yellow, or gray stains on your ceilings or walls, it means water has already breached all your roof’s defenses and is inside your home. By the time a leak is visible indoors, the problem in the attic and roof structure is often far more extensive. Water can travel along rafters and joists before showing up, meaning the source of the leak may be far from the stain. This requires immediate attention to prevent mold, mildew, and costly structural repairs.
7. A Sagging Roof Deck: This is the most alarming and urgent warning sign. A droopy, sagging, or wavy appearance in your roofline indicates a potential structural failure of the underlying decking or even the rafters. This is often caused by chronic water absorption, which leads to rot and weakens the wood. If you notice any sagging, do not attempt to inspect it yourself. Contact a professional roofer immediately, as this is a serious safety hazard that requires expert assessment.
The good news? Catching these signs early can save you thousands in repairs and protect your home’s value. When you need a shingle roof replacement assessment, having a trusted local team makes all the difference.
For a deeper dive into specific types of shingle damage and what they mean for your roof, check out our comprehensive guide: Don’t Get Shingled Out: Your Guide to Damaged Roof Shingles.
A Step-by-Step Breakdown: The Professional Shingle Roof Replacement Process
Planning a shingle roof replacement might feel overwhelming, but understanding each step demystifies the process and helps you feel confident about the investment. Think of it as giving your home a brand-new, high-performance protective shield—one that’s systematically engineered to keep your family safe and dry for decades to come.
At Sienna Roofing, we’ve perfected our systematic approach over countless installations. Every project follows the same careful steps, ensuring your new roof meets the highest standards for durability and craftsmanship.
Essential Tools and Materials for the Job
A successful roof replacement depends on having the right equipment and high-quality materials. Professional roofers come prepared with specialized tools that ensure efficiency, safety, and precision—things most homeowners simply don’t have lying around in their garage.
Safety always comes first. Our crews are equipped with OSHA-required safety harnesses, ropes, anchors, as well as gloves, eye protection, and hard hats. Working at height is inherently dangerous, and we never compromise on gear that prevents serious accidents.
The tear-off process requires heavy-duty tools like roofing shovels, pry bars, and flat bars to remove old shingles and break stubborn sealant bonds. For installation, we rely on pneumatic roofing nail guns calibrated for proper nail depth, which is far faster and more consistent than hand-nailing. We use galvanized roofing nails, typically 1.25 to 2 inches long, to resist corrosion and ensure a long-lasting hold.
Precision tools like hook blade utility knives ensure clean, accurate shingle cuts, while chalk lines help us maintain perfectly straight courses across the entire roof. A good tape measure is essential for accurate cutting and placement of every component.
The protective materials form the foundation of your new roof system. We use high-quality synthetic underlayment, which offers superior tear resistance and water protection compared to traditional felt paper. Metal drip edge is installed to direct water into gutters and away from your fascia. A crucial component is ice and water shield, a self-adhering membrane applied in valleys and around penetrations for extra protection. Finally, various types of flashing are used to seal vulnerable areas around chimneys, vents, and walls.
Of course, the asphalt shingles themselves are the stars of the show, available in various styles and colors. We also use roof cement and manufacturer-approved sealants for finishing touches, especially around penetrations and on ridge cap shingle tabs.
Step-by-Step: Your Shingle Roof Replacement from Tear-Off to Clean-Up
Your roof’s change follows a carefully orchestrated sequence. Each step builds on the previous one, creating an integrated, weatherproof system that protects your home.
1. Site Preparation and Old Roof Removal: The project begins by protecting your property. We lay down heavy-duty tarps to shield your landscaping, siding, and windows. We also protect sensitive items like air conditioning units. A dumpster is positioned for debris, and then the tear-off begins. Everything comes off—old shingles, felt paper, and worn materials—right down to the bare roof deck. Most building codes, including those in the Houston area, limit roofs to two layers maximum, so a complete removal is essential for a proper inspection and a fresh start.
2. Deck Inspection and Repair: This is one of the most critical steps. Once the old materials are gone, we examine every square inch of the decking (usually plywood or OSB) for signs of water damage, rot, warping, or soft spots. Any damaged sections are cut out and replaced with new, code-compliant wood sheathing of the correct thickness. This step is non-negotiable—your new shingles are only as strong as the foundation they’re attached to.

3. Metal Drip Edge Installation: Next, a metal drip edge is installed along all eaves (the lower edges) and rakes (the angled side edges) of the roof. This simple component performs the important work of directing water into your gutters while also preventing water from wicking under the edge of your shingles and rotting your fascia boards and roof deck edge.
4. Underlayment and Leak Barrier Application: We roll out a high-quality synthetic underlayment over the entire deck, overlapping each course to create a secondary protective barrier that catches any water that might slip past your shingles in extreme weather. In addition, we install a specialized self-adhering ice and water shield in all valleys and around roof penetrations like vents and chimneys. These are the areas most prone to leaks, and this extra layer of protection is often required by manufacturers to validate their best warranties.
5. Valley, Starter Shingle, and Main Shingle Installation: Valleys, where two roof slopes meet, handle a large volume of water. We install them carefully, often using an ‘open’ or ‘closed-cut’ method depending on the roof style. Next, specially designed starter shingles are installed along the eaves and rakes. These have a strong adhesive strip that creates a tight seal to prevent wind uplift. Then, the main shingle installation begins, working from the bottom up. Each shingle is properly aligned, overlapped, and secured with the correct number of nails in precise locations as specified by the manufacturer. This precision is key to the roof’s wind resistance.
6. Flashing Installation: This step protects all the vulnerable spots where your roof meets a vertical surface or has a penetration. We install new step flashing along walls, counter-flashing around chimneys, and new pipe boots around plumbing vents. Reusing old flashing is a common shortcut that leads to leaks; we always install new flashing to ensure a watertight seal.
7. Ridge Cap and Ventilation Installation: Specialized ridge cap shingles are installed along the roof’s peaks (ridges) and hips. These provide the finishing touch and seal the most exposed areas of your roof. If your home requires it, this is also when we install a ridge vent system to ensure proper attic ventilation, which is crucial for the longevity of your roof.
8. Final Cleanup and Inspection: The project isn’t finished until your property is spotless. We clean all debris from the roof and gutters. Then, we use powerful rolling magnets to carefully collect stray nails from your lawn, driveway, and garden beds. Finally, our project manager conducts a thorough final inspection to verify that every detail meets our high standards and manufacturer specifications.
Safety remains paramount throughout the entire process. We encourage homeowners to familiarize yourself with fall prevention and roof safety procedures if they ever need to access their roof for any reason.
Key Considerations for a Flawless Installation
Beyond following the basic steps, several critical factors separate an average roof from an exceptional one that protects your home for decades.
Proper Attic Ventilation: This is often overlooked but is absolutely essential for shingle longevity, especially in Texas. A balanced ventilation system—with intake vents at the soffits and exhaust vents at the ridge—regulates attic temperature and prevents moisture buildup. An overheated attic can literally bake your shingles from the inside out, causing them to become brittle and fail prematurely. Good ventilation also helps lower your energy bills.
Correct Shingle Offset and Nailing: Each course of shingles must be staggered or ‘offset’ from the course below it according to a specific pattern. This prevents the seams from lining up, which would create a direct path for water to flow through. Nailing precision is equally critical. Each shingle has a designated ‘nailing strip.’ Nails must be driven straight, flush with the shingle surface (not overdriven or underdriven), and in the correct quantity. Improper nailing is the #1 cause of shingle blow-off and will void most manufacturer warranties.
Weather Conditions During Installation: Professional roofers monitor the weather carefully. Extreme heat can make shingles overly pliable and easy to scuff, while cold temperatures can make them brittle and prone to cracking during installation. Installing a roof in the rain is never acceptable, as it can trap moisture within the system, leading to mold and rot. We schedule our projects to ensure optimal conditions for a perfect, long-lasting installation.
Professional Expertise: While a single shingle repair might seem manageable for a handy homeowner, a complete shingle roof replacement is a complex project. It involves understanding roof pitch calculations, local building codes, proper flashing techniques for various situations, and how to handle unexpected challenges like finding rotten decking. Choosing experienced professionals ensures access to better materials, proper insurance coverage, and meaningful warranties that protect your investment. We’ve seen too many well-intentioned DIY attempts fail prematurely due to subtle but critical installation errors.
For deeper insights into shingle types and installation specifics, explore our comprehensive resource: The Ultimate Guide to Shingle Roofs: No Shingle Left Unturned.
Decoding the Dollars: What Influences Shingle Roof Replacement Costs?
One of the first questions homeowners ask us is, “How much will a shingle roof replacement cost?” It’s a fair and important question, but the answer isn’t a simple flat rate. Understanding the various factors that go into the final price helps you make informed decisions, compare quotes intelligently, and avoid surprises down the road.
The reality is that costs can vary significantly—from around $4 to $40 per square foot depending on several key factors. For most homeowners with a standard-sized house, a typical architectural shingle roof replacement ranges between $8,000 to $12,000. However, your specific project might fall outside this range based on your home’s unique characteristics and your material choices.

Let’s break down what actually drives these costs, so you can plan your project and budget accordingly.
Roof Size and Pitch (Steepness): These are the most significant cost factors. A larger roof requires more materials and more labor hours, increasing the cost. But pitch is just as important. A low-slope, easily walkable roof (e.g., a 4/12 pitch) is straightforward. A steep roof (e.g., a 10/12 or 12/12 pitch) is more dangerous, requires extensive safety equipment (like roof jacks and harnesses), and slows down the installation process, which significantly increases labor costs.
Choice of Shingles: The material you choose makes a huge difference. Basic 3-tab shingles are the most affordable, but architectural or luxury shingles, while more expensive, offer much greater durability, wind resistance, and curb appeal. We’ll compare these in more detail below.
Labor Costs: Labor typically accounts for 60-70% of your total project budget. This covers the wages of a skilled, insured, and experienced roofing crew. While it’s tempting to choose the cheapest bid, quality installation is what makes a roof last. For our clients throughout Sugar Land, Missouri City, Katy, and the greater Houston Metro area, we provide competitive pricing that reflects our commitment to expert craftsmanship.
Full Tear-Off vs. Recover (Overlay): A complete shingle roof replacement with a full tear-off costs more upfront due to the labor of removal and disposal fees for a dumpster (which can be $1,200 to $1,300 alone). However, this is the only way to properly inspect the roof deck for damage. An overlay (installing new shingles over old ones) is cheaper but hides potential problems, adds excessive weight, and shortens the life of the new shingles. We always recommend a full tear-off for the best long-term result.
Complexity and Accessibility: A simple gable roof is easier and cheaper to replace than a roof with many hips, valleys, dormers, and skylights. Each of these features requires more time, detailed flashing work, and precision cutting, which adds to the labor cost. Accessibility to the roof also plays a role; if the house is surrounded by delicate landscaping or has limited space for a dumpster, it can add to the setup time and cost.
Permit Fees and Code Requirements: Municipal permit fees can range from $250 to $1,000 or more. These fees cover inspections that ensure your new roof meets local building codes for safety and durability. This isn’t just red tape; it’s a crucial step that protects you and the future value of your home.
Warranties: The type of warranty included can affect the price. A basic manufacturer’s warranty on materials is standard. However, a contractor’s workmanship warranty (covering installation errors) and improved manufacturer system warranties (covering materials, labor, and tear-off for a longer period) offer superior protection and may be included in a higher-quality, slightly more expensive bid.
For a detailed estimate custom to your specific home and needs, we’d love to help you explore your Roof Replacement options.
Comparing Common Asphalt Shingle Options
Asphalt shingles remain the most popular choice for good reason—they offer an excellent balance of cost, durability, and aesthetic variety. Here’s how the three main types stack up:
3-Tab Shingles: This is the most basic and budget-friendly option. They have a flat, uniform appearance and typically last 15-20 years. While economical, they have lower wind resistance ratings (usually 60 mph) and are more susceptible to damage, making them a less common choice in storm-prone areas like ours.
Architectural (or Dimensional) Shingles: This is the most popular choice for homeowners today. They are thicker, with a laminated construction that creates a beautiful, dimensional look with shadow lines that mimic wood shakes. They cost more than 3-tab shingles but offer significantly better durability, higher wind resistance (often 110-130 mph), and a longer lifespan, typically 25-30 years or more. The upgrade in curb appeal and performance makes them an excellent value.
Luxury (or Premium) Shingles: Representing the top tier of asphalt roofing, luxury shingles are the thickest and heaviest, designed to replicate the appearance of natural slate or cedar shakes at a fraction of the cost. They offer the longest lifespans (up to 50 years), the highest wind and impact resistance, and the most dramatic aesthetic impact. Many luxury shingles carry a Class 4 impact rating, which can sometimes qualify homeowners for a discount on their insurance premiums.