Metal Roofing Installation: Easy 40-Year Investment
Why a Metal Roof is a 40- to 70-Year Investment for Your Home
Metal roofing installation is a smart upgrade that transforms your home’s durability, energy efficiency, and long-term value. A metal roof is one of the best investments for your home, lasting 40 to 70 years—two to three times longer than traditional asphalt shingles. Homeowners are increasingly choosing high-quality roofing solutions like metal for its superior durability and long-term value.
The numbers tell a compelling story. Metal roofs cost between $4 and $30 per square foot, with an average 1,700-square-foot installation running $14,039. While the upfront cost is higher than asphalt, metal roofs provide a 48.1% average return on investment and can reduce cooling costs by reflecting solar heat.
Why metal roofing stands out:
- Lifespan: Lasts 40-70 years, compared to 15-20 for asphalt.
- Durability: Resistant to moss, mold, fire, and harsh weather.
- Eco-Friendly: Made of 30-60% recycled materials and is 100% recyclable.
- Efficiency: Reflects sunlight to lower energy bills.
- Value: Increases home resale value.
This guide provides a comprehensive walkthrough of the metal roofing installation process, empowering you to tackle this project with confidence. I’m Andre Castro, CEO of Sienna Roofing & Solar. With a degree in Construction Management and years of hands-on experience in Sugar Land, Texas, I’ve overseen countless metal roofing projects. This guide will walk you through everything you need to know.
 Roof Preparation (tear-off, deck inspection, safety setup), 2) Underlayment & Trim (ice shield, drip edge, valley flashing), 3) Panel Installation (reference lines, fastening, overlaps), and 4) Finishing (ridge caps, pipe boots, final inspection). Includes timeline showing 40-70 year lifespan compared to 15-20 years for asphalt shingles, and cost breakdown showing $14,039 average for 1,700 sq ft roof with 48.1% ROI - metal roofing installation infographic")
Choosing Your Armor: Metal Roof Materials and Styles
 side-by-side - metal roofing installation")
Before you begin your metal roofing installation, you must choose the right material and style. This decision impacts your upfront cost ($4 to $30 per square foot installed), long-term performance, and your home’s curb appeal. For homeowners in Sugar Land, Missouri City, or Richmond, understanding your options is key to selecting the best roofing solution for the Texas climate.
Comparing Metal Roofing Materials
Five primary metals dominate the market, each with unique properties.
- Steel Roofing: The most popular residential choice, steel offers a great balance of affordability ($7-$16/sq. ft.) and durability. Coated with zinc (galvanized) or an aluminum-zinc alloy (Galvalume), it resists corrosion and lasts 40-70 years.
- Aluminum Roofing: At $4-$11 per square foot, aluminum is the champion of corrosion resistance, making it ideal for humid and coastal climates like Southeast Texas. It’s lightweight and can last over 50 years.
- Copper Roofing: The premium option ($15-$30/sq. ft.), copper develops a classic green patina that protects the metal, allowing it to last over 100 years with minimal maintenance. It offers timeless beauty and unparalleled longevity.
- Zinc Roofing: Costing $6-$12 per square foot, zinc is highly durable (80-100+ years) and develops a self-healing protective patina. Its malleability allows for intricate architectural designs.
- Tin Roofing: Historically, this was tin-coated steel. Today, it refers to steel with modern coatings, costing $5-$12 per square foot and offering good durability (40-70 years).
Here’s how these materials compare side-by-side:
| Material | Cost/Sq. Ft. (Installed) | Lifespan (Years) | Key Properties |
|---|---|---|---|
| Steel | $7–$16 | 40-70 | Durable and affordable with Galvalume or galvanized coatings; requires paint for maximum protection |
| Aluminum | $4–$11 | 50-100+ | Superior natural corrosion resistance; ideal for humid or coastal environments; lightweight and energy-efficient |
| Copper | $15–$30 | 100+ | Premium aesthetic with distinctive patina; extremely durable; virtually maintenance-free |
| Zinc | $6–$12 | 80-100+ | Self-healing patina; highly moldable for complex designs; excellent durability with minimal maintenance |
| Tin | $5–$12 | 40-70 | Modern steel with advanced coatings; lighter than solid steel; good durability at moderate cost |
Metal Roof Styles and Profiles
Your choice of style affects appearance, weather resistance, and installation complexity.
- Standing Seam: Considered the gold standard, these panels feature raised vertical ribs with concealed fasteners. This system offers superior weather resistance and a sleek, modern aesthetic. It’s the preferred choice for homeowners seeking top-tier performance and durability.
- Corrugated Panel: This classic wavy profile uses an exposed fastener system, making installation simpler and more affordable. It’s a functional, budget-friendly option popular for outbuildings and some homes.
- Metal Shingles: Engineered to mimic traditional asphalt shingles, wood shakes, or clay tiles, these panels combine the durability of metal with classic aesthetics. They offer incredible design versatility for any architectural style.
Your final choice will depend on your budget, desired look, and home’s specific needs. A coastal property benefits from aluminum, while a traditional home in a suburban neighborhood might call for metal shingles.
, Corrugated (exposed fasteners, wavy, affordable), and Metal Shingles (mimic traditional, durable, aesthetic variety). Includes visual examples of each. - metal roofing installation infographic")
The Ultimate Step-by-Step Metal Roofing Installation Guide

A successful metal roofing installation depends on preparation, technique, and safety. While complex, a DIY installation is achievable, potentially saving you thousands since labor accounts for about 60% of the total cost. However, for complex roofs, professional expertise is invaluable.
Before starting, ensure your roof meets the minimum 3:12 slope required for most metal systems. Always consult the manufacturer’s instructions and local building codes. The Metal Construction Association’s installation manual is an excellent technical resource.
Step 1: Roof Preparation and Safety Setup
This foundational stage sets the tone for the entire project.
- Tear-Off vs. Overlay: A complete tear-off of old shingles is recommended. It allows for a thorough inspection and repair of the roof deck, ensuring a smooth, solid surface for your new roof. An overlay (installing over existing shingles) is sometimes possible but requires a professional inspection to rule out hidden damage. Wood shingles must always be removed.
- Deck Inspection: After the tear-off, inspect the plywood or OSB sheathing for rot, sagging, or damage. Make all necessary repairs. The surface must be clean, smooth, and dry.
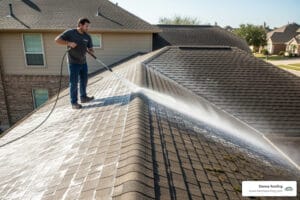
- Safety First: Metal panels are slippery. Always use OSHA-compliant fall protection, including a safety harness, anchored ropes, and guardrails. Wear soft-soled shoes to avoid scratching the panels, along with gloves and eye protection. Never work in wet or windy conditions.
- Tools & Materials: Gather your tools, including a screw gun, metal nibbler or shears, snips, and a chalk line. Order about 10% extra material to account for waste. For more details, see our new roof installation ultimate guide.
Step 2: Installing Underlayment and Trim
This layer is your roof’s secondary defense against water.
- Underlayment: Apply a self-adhering ice and water shield to vulnerable areas like eaves and valleys. Then, cover the entire roof deck with high-quality synthetic underlayment, overlapping courses as specified by the manufacturer.
- Drip Edge & Trim: Install drip edge along the eaves to direct water into gutters. Next, install eave trim and gable (rake) trim, ensuring proper overlaps and sealing to protect the roof edges and provide a finished look.
- Valley Flashing: Valleys handle significant water flow and require special attention. Install a rubberized underlayment followed by metal valley flashing, ensuring it is properly sealed and overlaps correctly to guide water off the roof.
Step 3: The Core of Your Metal Roofing Installation
Precision during this stage is critical for a weathertight roof.
- Establish a Square Line: Use the 3-4-5 method to snap a chalk line that is perfectly square to the eave. This ensures your first panel—and all subsequent panels—are installed straight.
- Install Panels: Begin on the downwind side of the roof to prevent wind-driven rain from getting under the seams. Place the first panel, ensuring a consistent 1-inch overhang at the eave to direct water into the gutter.
- Fastening: Follow manufacturer guidelines for fastener type and placement. For exposed fastener systems, use a screw gun with a clutch to drive screws just tight enough to compress the rubber washer without over-tightening. For standing seam, use the specified clips. Clean up all metal shavings immediately to prevent rust stains.
- Overlapping: Overlap panels according to the profile design, using sealant or butyl tape at the seams for an extra layer of weatherproofing.
Step 4: Finishing with Ridge Caps and Flashing
These final details seal your roof and give it a professional finish.
- Ridge Cap: Install foam closure strips at the roof’s peak to block moisture and pests. Apply sealant, then install the ridge cap over the closures, fastening it securely according to manufacturer specifications.
- Pipe Flashing: Use pre-molded rubber pipe boots to seal around plumbing vents and other penetrations. The boot should fit snugly around the pipe and be sealed and fastened to the roof panel.
- Chimney Flashing: This complex task involves a system of base flashing, step flashing, and counter-flashing to direct water away from the chimney. Due to its complexity, this is often best left to a professional.
- Final Inspection: Thoroughly inspect all fasteners, seams, and flashing. Clean the entire roof surface of any remaining metal shavings or debris with a soft brush.
Cost, Drawbacks, and Long-Term Value

The upfront cost of a metal roofing installation averages $14,039 for a typical 1,700-square-foot roof. While higher than asphalt shingles (around $7,153), a metal roof’s 40-70 year lifespan means you are buying one roof instead of two or three. This longevity, combined with a 48.1% average ROI, makes it a financially sound home upgrade.
When you factor in energy savings, reduced maintenance, and increased home value, the long-term picture becomes clear. For a detailed breakdown, see our metal roof cost guide.
What Factors Influence the Final Price?
Several variables affect your final cost:
- Material Type: Copper ($15-$30/sq. ft.) is a premium choice, while aluminum and steel ($4-$16/sq. ft.) are more budget-friendly.
- Roof Size and Pitch: Larger or steeper roofs require more material and labor, increasing costs.
- Labor Costs: Typically 60% of the project budget. DIY can save money, but professional installation ensures quality and includes warranties.
- Geographic Location: Labor rates and building codes in areas like Sugar Land, TX, influence pricing.
- Roof Complexity: Hips, valleys, dormers, and skylights add labor time and require more intricate flashing work.
- Installation Method: An overlay (installing over existing shingles) can reduce cost but requires a professional inspection to ensure the underlying structure is sound.
Are There Any Downsides to Metal Roofing?
While an excellent choice for many, metal roofing has a few potential drawbacks to consider:
- Initial Expense: The primary barrier for many homeowners is the higher upfront cost compared to asphalt shingles.
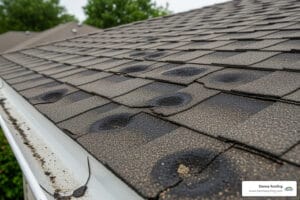
- Denting Potential: Lighter gauge metals can be dented by large hail or falling branches. Thicker gauges offer better impact resistance.
- Repair Complexity: Damaged panels can be more difficult and expensive to repair than replacing a few asphalt shingles, often requiring specialized tools and expertise.
- Installation Nuances: Proper installation is critical and less forgiving than other materials. A small mistake can lead to significant issues, which is why professional installation is often recommended.
- Noise Concerns (Myth): Modern metal roofs installed over a solid deck with insulation are no louder than other roofing types. The old stereotype of a noisy “tin roof” applies to uninsulated installations on open frames, not residential homes.
Frequently Asked Questions about Metal Roof Installation
Here are answers to common questions homeowners in Sugar Land, Missouri City, and Richmond, TX, ask about metal roofing installation.
Can I install solar panels on a metal roof?
Yes, a metal roof is an ideal platform for solar panels. Its structural strength easily supports the weight, and its longevity (40-70 years) means you won’t have to remove the panels to replace the roof during the solar system’s 25-30 year lifespan. Standing seam metal roofs are particularly well-suited, as mounting clamps can attach to the seams without creating penetrations.
Does a metal roof make rain louder?
No, this is a common myth. A modern metal roof installed over a solid roof deck with proper underlayment and attic insulation is no louder than an asphalt shingle roof. These layers work together to create an effective sound barrier, dampening the noise from rain or hail. The stereotype of a noisy roof comes from old, uninsulated installations on structures like barns, not modern homes.
Can a metal roof be installed over my existing asphalt shingles?
Yes, in many cases, a metal roof can be installed over a single layer of existing asphalt shingles. This method, known as an overlay or roof-over, can save significant money on tear-off labor and disposal costs. However, a professional inspection is critical before proceeding. The existing roof deck must be structurally sound, dry, and free of damage. If there are any issues or multiple layers of old roofing, a full tear-off is necessary to ensure the longevity of your new metal roof.
At Sienna Roofing, we always conduct a thorough inspection to recommend the best approach for your home. Call us at (832) 792-9255 to schedule your free roof evaluation.
Is a DIY Installation Right for You?
A DIY metal roofing installation can save you thousands of dollars, as labor accounts for roughly 60% of the total cost. However, it’s a demanding project that requires specialized tools, careful planning, and a serious commitment to safety. Working at heights with large panels is inherently dangerous.
For most homeowners in Sugar Land, Missouri City, or Richmond, TX, the benefits of professional installation outweigh the savings of a DIY project.
Why Choose a Professional Installer?
- Expert Craftsmanship: Professionals have the experience to handle complex details like valleys and flashing, ensuring a watertight finish.
- Warranty Protection: Professional jobs come with warranties on both materials and workmanship, giving you long-term peace of mind.
- Safety and Insurance: Licensed crews follow strict safety protocols and are fully insured, protecting you from liability.
- Efficiency: A professional team can complete the job in a few days, minimizing disruption and exposure to the elements.
The proven benefits of a metal roof—a 48.1% average ROI, a 40-70 year lifespan, and lower energy bills—are fully realized only when the installation is flawless. For homeowners who want to guarantee a perfect, warrantied finish, partnering with an experienced roofing company in Sugar Land, TX is the smartest choice.
At Sienna Roofing, we are committed to providing personalized service with a 100% satisfaction guarantee. Ready to discuss your metal roofing project? Our team of experts is here to provide you with a free estimate and answer all your questions.