Storm Damage Roof Replacement: 5 Critical Steps
When Your Roof Takes a Hit: Understanding Storm Damage Roof Replacement
Storm damage roof replacement is the complete removal and installation of a new roof system after severe weather compromises its integrity. For Houston-area homeowners, this becomes necessary when damage from hail, high winds, or hurricanes is too extensive for simple repairs. When you’re facing the aftermath of a storm, our team of Houston storm damage experts is here to help you steer the process and restore your peace of mind. The average cost to install a new roof is around $8,500, but with the right insurance and contractor, your out-of-pocket expense can be minimized.
Quick Answer: The Storm Damage Roof Replacement Process
- Safety First – Secure your property and document all damage.
- Professional Inspection – Have a licensed roofer assess the full extent of damage.
- File Insurance Claim – Contact your insurance company and schedule an adjuster visit.
- Get Estimates – Obtain multiple quotes from reputable local contractors.
- Approval & Installation – Work with your contractor and insurer to finalize the scope and begin work.
- Final Inspection – Verify the work meets code and your satisfaction.
Average Timeline: 2-8 weeks from damage to completion
Most Critical Step: Acting quickly to prevent secondary water damage
The clock starts ticking the moment a storm passes. Delaying action can lead to water infiltration, structural damage, mold growth, and complications with your insurance claim. This guide walks you through each critical step, from identifying subtle hail damage to navigating the insurance maze and selecting materials that can withstand the next Texas storm.
I’m Andre Castro, founder and CEO of Sienna Roofing. I’ve personally overseen hundreds of storm damage roof replacement projects across the Houston Metro area. My team and I are committed to helping families restore their homes with quality craftsmanship they can trust, ensuring every project meets the highest standards for durability and protection.
 Safety & Documentation (24-48 hours) - Secure property, take photos, make temporary repairs; 2) Professional Inspection (1-3 days) - Licensed contractor assesses damage, prepares detailed report; 3) Insurance Claim Filing (1-2 weeks) - Submit claim, meet with adjuster, review estimate; 4) Contractor Selection & Approval (1-2 weeks) - Get multiple quotes, verify credentials, finalize scope; 5) Roof Installation (1-3 days) - Tear-off, inspection, new materials installed, cleanup. Total typical timeline: 2-8 weeks. Note: Acting within 72 hours of storm significantly improves claim success rate. - storm damage roof replacement infographic")
After the Storm: Immediate Safety and Damage Assessment
The moments after a storm are critical. A methodical, safety-first approach is essential for protecting your family and home, and it sets the foundation for a smooth insurance claim and replacement process. Hasty decisions can lead to injury or worsen existing damage.
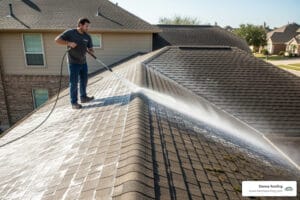
Step 1: Prioritize Safety and Take Immediate Protective Measures
Your first priority is safety. Stay off your roof. A compromised roof can be unstable, and wet surfaces are dangerously slippery. Professionals have the training and safety equipment to perform an inspection. If you notice electrical hazards like frayed wires or smell gas, shut off the main breaker or gas valve and call emergency services from a safe distance.
Before making any temporary repairs, document everything first. Use your smartphone to take clear photos and videos of all visible damage from the ground. This visual record is your most powerful tool for your insurance claim. Once documented, you can make temporary repairs, such as covering exposed areas with a waterproof tarp to prevent water intrusion. Keep all receipts for materials, as these are typically reimbursable.
Step 2: How to Identify Signs of Storm Damage on Your Roof
Not all storm damage is obvious. Some of the most serious issues can hide in plain sight, slowly compromising your roof until a small problem becomes an emergency.
- Wind Damage: Look for missing, lifted, or curled shingles. The real danger is often the broken watertight seals between shingles, which leave your underlayment exposed.
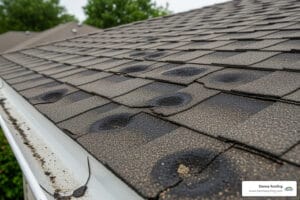
- Hail Damage: Hailstones create dents, cracks, or pockmarks. On asphalt shingles, the most common sign is granule loss—look for accumulations of what looks like coarse sand in your gutters and downspouts. Dented metal flashing, vents, and gutters are also strong indicators.
- Debris Impact: Falling branches can puncture shingles or crack tiles, leading to significant water intrusion over time.
- Interior Warning Signs: Water stains on ceilings or walls are definitive proof of a roof leak, even if external damage isn’t visible from the ground.

Pro Tip: Inspect ground-level collateral damage. Dents on your car, mailbox, or window screens indicate hail activity that almost certainly affected your roof as well. For a deeper understanding of how hail affects different roofing materials, read our detailed article on Hail Damage to Asphalt Shingles.
Step 3: Documenting Damage for Your Insurance Claim
Your insurance claim’s success depends on the quality of your documentation. Without thorough evidence, legitimate storm damage roof replacement claims can face delays or denial.
- Create Comprehensive Visuals: Take wide-angle and close-up photos and videos of all damage, including shingles, gutters, flashing, and any interior water stains.
- Keep a Written Log: Record the date of the storm and the date you found the damage. Describe each damaged area in detail.
- Save All Receipts: Keep every receipt for temporary repairs and emergency materials. These are typically reimbursable.
- Stay Organized: Create a dedicated digital and physical folder for all photos, notes, receipts, and communications with your insurer and contractors. This preparation demonstrates credibility and speeds up the entire process. For complete guidance, consult our Roof Insurance Claim Complete Guide.
Navigating the Maze: Your Guide to the Roof Insurance Claim Process
Filing an insurance claim can feel overwhelming, but understanding the process transforms it into a manageable task. This section breaks down what’s covered, how policies work, and what to expect at each step to secure the compensation you deserve for your storm damage roof replacement.
What Types of Storm Damage Are Covered by Homeowners Insurance?
Most homeowners insurance policies cover damage from sudden, accidental events, known as “covered perils.” For roofs, this typically includes:
- Wind Damage: From straight-line winds, tornados, or hurricanes (winds of 74 mph or greater, per the National Hurricane Center). If wind lifts, curls, or removes shingles, your policy should cover it.
- Hail Damage: Impacts from hailstones that cause dents, cracks, and granule loss are a frequently covered peril.
- Debris Impact: Damage from fallen trees or limbs during a storm is also typically covered.
However, policies do not cover gradual deterioration from wear and tear or damage resulting from neglect. The age of your roof can also affect coverage, with some policies limiting payouts for roofs over 20 years old.
ACV vs. RCV: How Your Policy Determines Your Payout
Understanding the difference between Actual Cash Value (ACV) and Replacement Cost Value (RCV) is critical, as it can mean a difference of thousands of dollars.
- Actual Cash Value (ACV): This policy pays the depreciated value of your roof. If your 10-year-old roof has a 20-year lifespan, an ACV policy pays about 50% of the replacement cost, minus your deductible. You are responsible for the rest.
- Replacement Cost Value (RCV): This policy covers the full cost to replace your roof with new materials of similar quality, minus your deductible. The payout is often in two parts: an initial check for the ACV, and a second check for the recoverable depreciation after the work is complete.
 and Replacement Cost Value (RCV) policies, showing columns for Definition, Payout Calculation, and Homeowner Out-of-Pocket Cost. - storm damage roof replacement infographic")
An RCV policy is far more favorable for homeowners needing a full replacement. Check your policy documents to confirm which type you have.
The Step-by-Step Process for a Storm Damage Roof Replacement Claim
Follow these steps to steer your claim successfully:
- Contact Your Insurer: Report the damage as soon as possible with your policy number and storm details. They will assign you a claim number and an adjuster.
- Schedule the Adjuster Inspection: The adjuster will visit to assess the damage. It is crucial to have your roofing contractor present during this inspection. A roofer can point out damage an adjuster might miss, ensuring a more accurate assessment.
- Review the Estimate: Carefully compare the adjuster’s estimate with your contractor’s. Insurance estimates often miss necessary items like code upgrades, proper ventilation, or contractor overhead.
- Supplement the Claim: If there are discrepancies, your contractor can submit a supplement with additional documentation to justify the full scope of work. This is a standard part of the process.
- Receive Payment: With an RCV policy, you’ll get an initial ACV check. After your contractor completes the storm damage roof replacement and submits final invoices, the insurer releases the remaining funds (recoverable depreciation). You are always responsible for your deductible.

Having an experienced contractor from Sienna Roofing as your advocate can make this process significantly smoother. For a complete walkthrough, see our Roof Insurance Claim Complete Guide.
The Ultimate Guide to Storm Damage Roof Replacement
With an approved claim, the focus shifts to the physical storm damage roof replacement. This is an opportunity to upgrade your home’s protection against future Texas storms by making informed decisions about materials and the installation process.
How Different Roofing Materials Withstand Texas Storms
Choosing the right material is critical for longevity in Texas’s harsh weather. Here’s a comparison of popular options:
- Asphalt Shingles: The most common choice due to their cost-effectiveness (installations from $7,500) and a typical 20-year lifespan. For storm-prone areas, upgrading to Class 4 impact-resistant shingles is a wise investment. These are tested to withstand 2-inch hail and may qualify you for insurance premium discounts.
- Metal Roofing: A durable option with a lifespan of up to 50 years. Though the upfront cost is higher (average $11,655+), metal roofs offer superior resistance to wind, hail, and fire. They also reflect solar heat, which can lower cooling costs.
- Clay and Concrete Tiles: These offer a distinctive look, a 30-year lifespan, and excellent fire and wind resistance. However, they can be vulnerable to cracking from heavy hail or debris and require a reinforced roof structure.
, Metal Roofing (50 years, $11,655+), and Clay/Concrete Tiles (30 years, higher cost). - storm damage roof replacement infographic brainstorm-6-items")
For a detailed breakdown of local costs, see our guide on the Average Cost of a New Roof in Texas.
What to Expect During the Roof Installation Process
A professional storm damage roof replacement is a systematic process designed to be efficient and minimally disruptive. The project typically takes 1-3 days.
- Property Protection: Before work begins, we protect your landscaping, driveway, and home exterior with tarps and barriers.
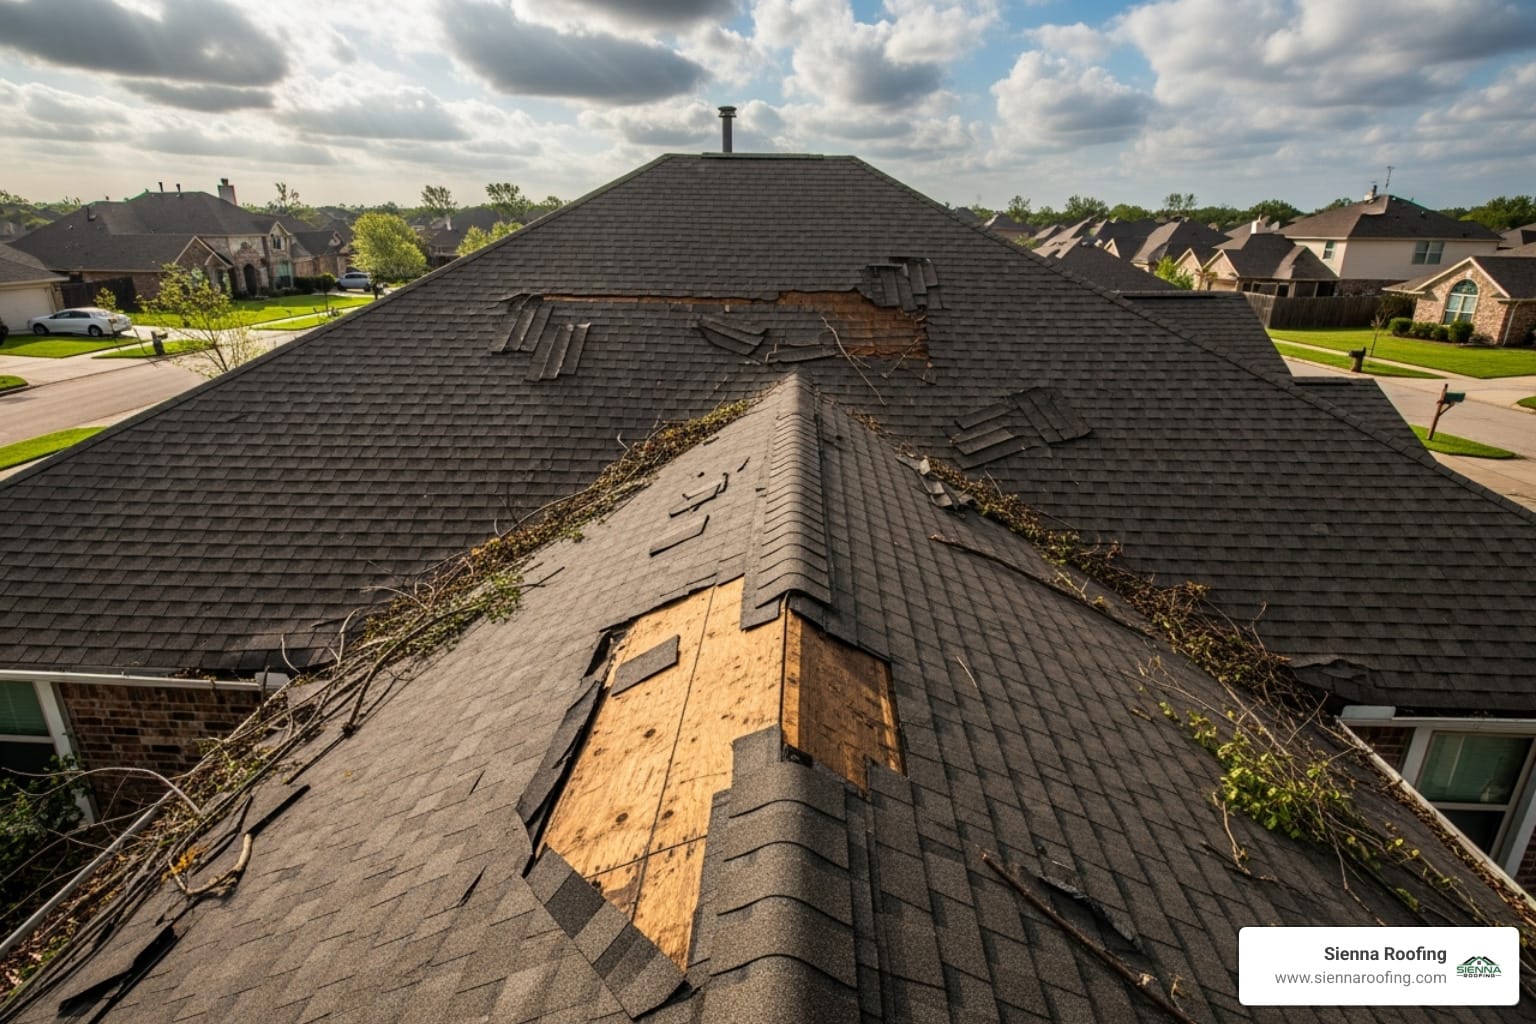
- Tear-Off: The old roofing material is completely removed down to the decking.
- Decking Inspection: The exposed roof deck is inspected for water damage or structural issues. Any compromised sections are replaced to ensure a solid foundation.
- Underlayment and Material Installation: A new, high-quality synthetic underlayment is installed, followed by your chosen roofing material (shingles, metal, etc.), according to precise manufacturer specifications.
- Flashing and Ventilation: All flashing around chimneys, vents, and valleys is replaced and sealed to create a watertight barrier. Proper attic ventilation is installed to regulate temperature and moisture.
- Cleanup and Final Walkthrough: The site is thoroughly cleaned, with magnetic sweeps used to collect stray nails. We then conduct a final walkthrough with you to ensure your complete satisfaction and provide warranty information.
This meticulous process ensures your new roof is built to last. Learn more about our comprehensive approach on our Roof Replacement page.

Avoiding “Storm Chasers”: How to Spot and Prevent Roofing Scams
After a major storm, fraudulent “storm chaser” contractors often target vulnerable homeowners. These opportunistic companies follow severe weather, preying on residents under stress. Knowing how to identify and avoid them is crucial for a successful storm damage roof replacement.
Red Flags of a “Storm Chaser” Roofing Company
Protecting yourself starts with recognizing these common warning signs:
- High-Pressure Sales Tactics: They demand an immediate decision, claiming the offer is only valid “today.”
- Offers to Waive Your Deductible: This practice is illegal in Texas. A legitimate contractor cannot legally pay or absorb your insurance deductible.
- Out-of-State Presence: Their vehicles have out-of-state license plates, and they lack a permanent local office.
- Large Upfront Payments: They demand a significant portion or the full amount before work begins.
- Aggressive Door-to-Door Solicitation: They appear at your door immediately after a storm, pressuring you to sign a contract.
- Vague Contracts: The contract lacks specific details on the scope of work, materials, costs, and warranty.
- Unverifiable Credentials: They cannot provide proof of local licensing, liability insurance, or workers’ compensation.
How to Vet and Hire a Trustworthy Local Roofing Contractor
Choosing the right partner is key to a high-quality outcome. Follow these steps to hire a reputable local professional:
- Check for License and Insurance: Verify the contractor is licensed to operate in your area and carries both liability and workers’ compensation insurance. This protects you from liability.
- Ask for Local References: A trustworthy contractor will have a list of satisfied customers in your community. Follow up with them.
- Read Online Reviews: Check platforms like Google and the Better Business Bureau for consistent positive feedback.
- Get Multiple Written Estimates: Obtain at least three detailed estimates to compare pricing, materials, and scope of work. Be wary of unusually low bids.
- Verify a Local Address: Ensure the company has an established, physical office in the Houston area, indicating a long-term commitment.
- Understand the Warranty: Ask about both the material manufacturer’s warranty and the contractor’s workmanship warranty for long-term peace of mind.
Frequently Asked Questions about Storm Damaged Roofs
When you’re dealing with the aftermath of a storm, questions arise quickly. Here are clear, direct answers to the questions we hear most often from Houston-area homeowners.
How much damage does a roof need for a full replacement?
A full storm damage roof replacement is typically required when damage is widespread, not just based on a single factor. A replacement is generally necessary if:
- 25-30% or more of the roof’s surface is damaged by wind or hail.
- The roof’s underlying structure or decking is compromised by water or impact.
- The roof is nearing the end of its lifespan (15-20 years for asphalt shingles), as repairing it is often not cost-effective.
- Local building codes mandate a full replacement if a certain percentage of the roof is damaged.
An honest assessment from a professional roofing contractor is the only way to determine if repairs are sufficient or if a full replacement is the correct course of action.
How long do I have to file a roof claim after a storm?
Most insurance policies allow between six months and two years to file a claim after a storm. However, you must check your specific policy for the exact deadline. It is critical to file your claim as soon as you find damage.
Waiting to file can complicate your claim. The insurer may argue that the damage was caused by a subsequent storm or by neglect, which can lead to a denial. Prompt filing and thorough documentation are the best ways to ensure a smooth approval process. For more on this, see our Roof Insurance Claim Complete Guide.
Will my insurance premiums go up if I file a storm damage claim?
Filing a single claim for storm damage typically does not cause your individual premium to increase. Insurance companies classify storm damage as an “Act of God”—an event outside of your control—and generally do not penalize individual policyholders for such claims.
However, your rates may still rise due to regional rate increases. After a catastrophic event causes widespread damage in an area like Houston, insurers often raise rates for all policyholders in that region to offset their losses. This increase would happen regardless of whether you personally filed a claim.
The bottom line: Do not let fear of a premium hike prevent you from filing a legitimate claim. Your insurance exists to protect your home from exactly this type of event.
Your Partner in Storm Recovery: Get Your Roof Replaced Right
The journey through a storm damage roof replacement doesn’t have to be overwhelming. With the right team, a stressful situation can become an opportunity to upgrade your home’s protection and value.
This guide has armed you with the knowledge to act quickly, document thoroughly, and choose a local contractor you can trust. From the initial inspection in Sugar Land to the final nail, having a partner who understands Houston’s unique weather challenges makes all the difference.
At Sienna Roofing, we’ve built our reputation on being more than just a roofing company—we’re your neighbors, committed to this community for the long haul. We treat every storm damage roof replacement with the care it deserves and back our work with a 100% satisfaction guarantee. We believe quality craftsmanship and transparent communication are what turn stressed homeowners into satisfied customers.
If you’re dealing with the aftermath of a storm or just need expert guidance, we’re here to help. No pressure, no gimmicks—just honest assessments and high-quality work that stands the test of time.
Ready to restore your roof and reclaim your peace of mind? Request your free, no-obligation inspection online. Let’s give your home the protection it deserves. Get Your Free Roof Inspection